
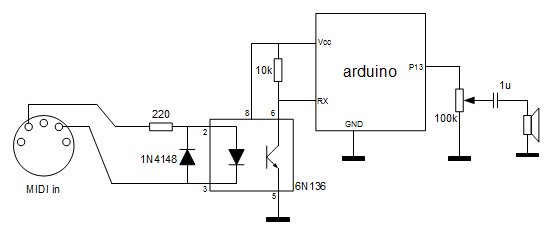
El procesador del Arduino se encarga simplemente de parsear los mensajes MIDI: Genera los tonos y los silencios ante las tramas NOTE ON y NOTE OFF que detecta por la entrada MIDI.
#define  MIDI_NOTE_LOW   16
#define  MIDI_NOTE_HIGH  107

// midi frequencies from C0 to B7
int freq[] = {
    21, 22, 23, 24, 26, 28, 29, 31,
    33, 35, 37, 39, 41, 44, 46, 48, 52, 55, 58, 62,
    65, 69, 73, 78, 82, 87, 92, 98, 104, 110, 117, 123,
    131, 139, 147, 156, 165, 175, 185, 196, 208, 220, 233, 247,
    262, 277, 294, 311, 329, 349, 370, 392, 415, 440, 466, 494,
    523, 554, 587, 622, 659, 698, 740, 784, 831, 880, 932, 988,
    1047, 1109, 1175, 1245, 1319, 1397, 1480, 1568, 1661, 1760, 1864, 1976,
    2093, 2217, 2349, 2489, 2637, 2794, 2960, 3136, 3322, 3520, 3729, 3951
};

#define  MIDI_STATUS_WAIT_STATUS          0
#define  MIDI_STATUS_WAIT_NOTE            1
#define  MIDI_STATUS_WAIT_VELOCITY        2
#define  MIDI_STATUS_WAIT_NOTE_OR_STATUS  3

#define  SPEAKER_PIN  13

int midiStatus = MIDI_STATUS_WAIT_STATUS;
int midiNote = 0;
int midiVelocity = 0;

void setup() {
    Serial1.begin(31250);
}

void parseMidi(int b) {
    if (midiStatus == MIDI_STATUS_WAIT_STATUS) {
        if ((b & 0xF0) == 0x90)
            midiStatus = MIDI_STATUS_WAIT_NOTE;
    }
    else if (midiStatus == MIDI_STATUS_WAIT_NOTE) {
        midiNote = b;
        midiStatus = MIDI_STATUS_WAIT_VELOCITY;
    }
    else if (midiStatus == MIDI_STATUS_WAIT_VELOCITY) {
        midiVelocity = b;
        midiStatus = MIDI_STATUS_WAIT_STATUS;
        if (midiVelocity == 0)
            noTone(SPEAKER_PIN);
        else {
            if ((midiNote >= MIDI_NOTE_LOW) && (midiNote <= MIDI_NOTE_HIGH))
                tone(SPEAKER_PIN, freq[midiNote - MIDI_NOTE_LOW]);
        }
        midiStatus = MIDI_STATUS_WAIT_NOTE_OR_STATUS;
    }
    else if (midiStatus == MIDI_STATUS_WAIT_NOTE_OR_STATUS) {
        if (b < 0x80) {
            midiNote = b;
            midiStatus = MIDI_STATUS_WAIT_VELOCITY;
        }
        else if ((b & 0xF0) == 0x90)
            midiStatus = MIDI_STATUS_WAIT_NOTE;
        else
            midiStatus = MIDI_STATUS_WAIT_STATUS;
    }
}

void loop() {
    while (Serial1.available() > 0) {
        int b = Serial1.read();
        parseMidi(b);
    }
}
Como se puede ver, el parseado de las tramas MIDI se realiza mediante un sencillo autómata finito (DFA) de 4 estados.
[ añadir comentario ] ( 1326 visualizaciones ) | [ 0 trackbacks ] | enlace permanente
Tweet | |

 ( 3 / 3466 )
He construido un sencillo circuito utilizando una placa Arduino para controlar las luces de un belén. El procesador genera destellos aleatorios en función de la luz ambiente que mide a través de una de las entradas analógicas.

A continuación el código fuente para Arduino:
#define  NUM_ESTRELLAS  5
#define  MS_BUCLE  500

int pines[NUM_ESTRELLAS] = {
    2, 3, 4, 5, 6
};


void setup() {
  int n;
  randomSeed(analogRead(0));
  for (n = 0; n < NUM_ESTRELLAS; n++)
    pinMode(pines[n], OUTPUT);
}


void loop() {
  int n;
  int v = analogRead(0);
  for (n = 0; n < NUM_ESTRELLAS; n++) {
    int r = random(0, 1023);
    if (r < v)
      digitalWrite(pines[n], HIGH);
    else
      digitalWrite(pines[n], LOW);
  }
  delay(MS_BUCLE);
}
[ añadir comentario ] ( 5957 visualizaciones ) | [ 0 trackbacks ] | enlace permanente
Tweet | |
( 3 / 1795 ) Calendario


